The entryway is the first impression your home makes. It’s the handshake, the welcome mat, and the initial whisper of your personal style. Yet, for many, it becomes a chaotic dumping ground for keys, mail, bags, and of course, coats. A well-designed entryway, however, can transform this often-overlooked space into a functional and aesthetically pleasing haven. Central to achieving this balance is the humble coat hanger. While store-bought options abound, for those seeking a personal touch, unique functionality, and a dash of creativity, DIY wall-mounted coat hangers offer a compelling solution.
This article will delve into the world of DIY entryway coat hangers, exploring creative ideas that are not only practical but also add significant character to your home. We’ll examine the benefits of going DIY, discuss key considerations for design and materials, and then dive into a plethora of inspiring projects, catering to various skill levels and aesthetic preferences.
Why Go DIY for Your Entryway Coat Hangers?

The allure of DIY is multifaceted, extending beyond mere cost savings. For entryway coat hangers, the advantages are particularly pronounced:
- Personalization: Store-bought hangers often adhere to generic designs. DIY allows you to tailor the size, style, and finish to perfectly complement your existing décor and meet your specific needs.
- Space Optimization: Entryways can be cramped. Custom-built hangers can be designed to fit awkward spaces, maximize vertical storage, and even incorporate additional features like mail slots or shelves.
- Unique Aesthetic: A handmade coat hanger can be a statement piece, a conversation starter, and a reflection of your personality. It elevates your entryway from mundane to memorable.
- Sustainability: Repurposing materials, such as reclaimed wood or old hardware, is a fantastic way to embrace eco-friendly practices and give new life to discarded items.
- Sense of Accomplishment: There’s an undeniable satisfaction in creating something beautiful and functional with your own hands.
Consider the statistic that the average person spends approximately 10 minutes per day looking for misplaced items. While this isn’t solely coat-related, a well-organized entryway with designated coat hanging space can significantly reduce this frustration. A custom DIY solution ensures every item has its place, contributing to a more streamlined morning routine.
Key Considerations Before You Start
Before embarking on your DIY coat hanger adventure, a little planning goes a long way:
Assessing Your Needs:
- Volume of Items: How many coats, bags, hats, and scarves do you typically need to hang? This will dictate the number and spacing of hooks.
- Type of Items: Are you primarily hanging heavy winter coats or lighter jackets? This will influence the strength and type of hooks needed.
- Entryway Size and Layout: Measure your space carefully to ensure your design fits without obstructing walkways or doors.
- Accessibility: Consider who will be using the hangers. Are there children who need lower hooks?
Choosing Your Materials:

The beauty of DIY is the vast array of materials you can utilize. Here are some popular choices:
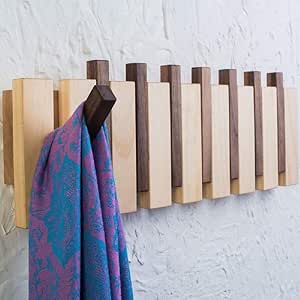
- Wood: A classic and versatile choice. Consider reclaimed barn wood for a rustic charm, smooth pine for a minimalist look, or sturdy oak for durability.
- Metal: Offers a modern or industrial aesthetic. Think pipe fittings, repurposed metal brackets, or even old tools.
- Found Objects: This is where true creativity shines. Old oars, vintage doorknobs, discarded bicycle parts, or even cleverly shaped branches can be transformed into unique hangers.
- Hardware: The hooks themselves are crucial. Options range from simple screw-in hooks to decorative cast iron, ceramic, or even leather pulls.
Skill Level and Tools:
Be honest about your DIY abilities and the tools you have access to. Many projects require basic woodworking skills and tools like a drill, saw, sandpaper, and a level. However, there are also simpler projects that require minimal tools and expertise.
Creative DIY Wall Mounted Coat Hanger Ideas

Now, let’s get inspired! Here are some compelling DIY ideas, categorized by style and complexity:
Rustic Charm: Reclaimed Wood Masterpieces

Reclaimed wood offers an instant sense of history and character. The imperfections – nail holes, weathered grain, and natural cracks – are part of its charm.
The Barn Wood Plank with Vintage Hooks
Concept: A simple plank of reclaimed barn wood adorned with a row of vintage or antique-style hooks.
Execution:
- Source a sturdy piece of barn wood. Clean it thoroughly, but avoid over-sanding if you want to preserve its rustic patina.
- Determine the desired spacing for your hooks, ensuring enough room for coats to hang without bunching.
- Pre-drill holes for your chosen hooks.
- Attach the hooks securely.
- Mount the plank to your wall using robust anchors and screws. Consider leaving a small gap between the plank and the wall for a floating effect.
Case Study: Sarah, a homeowner in a rural area, found old barn wood from a demolition site. She attached cast iron wagon wheel hub hooks to the plank and mounted it above her fireplace in the entryway. The result was a stunning focal point that complemented her farmhouse décor.
The Driftwood Statement Piece
Concept: A unique piece of driftwood, with its natural curves and textures, serves as the base for hanging items.
Execution:
- Find a piece of driftwood that is substantial enough to hold multiple items.
- Clean and dry the driftwood. You may want to seal it with a matte varnish for protection.
- Attach various types of hooks – rope-wrapped hooks, metal S-hooks, or even simply drill holes for rope loops.
- Securely mount the driftwood to the wall, ensuring it’s balanced and stable.
Modern and Minimalist: Sleek Designs for Contemporary Spaces

For those who prefer clean lines and uncluttered aesthetics, modern DIY hangers offer a sophisticated solution.
The Pipe Fitting Organizer
Concept: Industrial-style pipe fittings are assembled to create a functional and stylish coat rack.
Execution:
- Purchase various lengths of galvanized or black iron pipe and fittings (elbows, tees, flanges).
- Plan your design, considering the number of hooks and the overall width.
- Screw the pipes and fittings together to form the desired structure.
- Use flanges to attach the assembled unit securely to the wall. You can use short pipe nipples extending from the flanges to act as the hanging points, or attach separate hooks.
Statistic: The global market for home décor, which includes wall accessories, is projected to reach over $200 billion by 2025. This highlights the demand for stylish and functional home solutions, including entryway organization.
The Floating Shelf with Integrated Hooks
Concept: A minimalist floating shelf with discreetly integrated hooks below.
Execution:
- Construct or purchase a sturdy floating shelf.
- Attach small, low-profile hooks to the underside of the shelf. Alternatively, you can rout channels into the shelf to recess the hooks for an even sleeker look.
- Mount the shelf according to the manufacturer’s instructions.
Eclectic and Whimsical: Turning Found Objects into Art
This category is for the truly adventurous DIYer, where imagination is the only limit.
The Bicycle Part Rack
Concept: Old bicycle parts – handlebars, pedals, or even spokes – are repurposed into unique coat hooks.
Execution:
- Source old bicycle parts. Clean them thoroughly.
- Experiment with different arrangements. Handlebars can be mounted horizontally to create multiple hanging points. Individual pedals can be mounted with screws.
- Securely attach the parts to a sturdy backing board or directly to the wall.
The Vintage Doorknob Collection
Concept: A diverse collection of vintage doorknobs mounted on a decorative wooden board.
Execution:
- Collect a variety of interesting vintage doorknobs.
- If the doorknobs have screws attached, you can mount them directly to a wall. For doorknobs without screws, you might need to drill pilot holes and use specialized mounting hardware.
- Alternatively, mount the doorknobs onto a decorative wooden plank that is then attached to the wall.
Simple and Practical: Quick Projects for Beginners
Don’t have a lot of time or tools? These projects are designed for ease and speed.
The Painted Plywood with Pegs
Concept: A simple piece of plywood painted in a vibrant color, with wooden pegs hammered in for hanging.
Execution:
- Cut a piece of plywood to your desired size.
- Sand and paint the plywood in a color that pops or complements your décor.
- Hammer wooden dowels or sturdy branches into pre-drilled holes at even intervals. Ensure they are secure.
- Mount the plywood to the wall.
The Branch Hanger
Concept: A sturdy branch from a tree, cleaned and mounted horizontally, with its natural protrusions acting as hooks.
Execution:
- Find a strong, attractive branch with natural forks or knots.
- Clean the branch thoroughly and allow it to dry completely. You may want to seal it.
- Mount the branch to the wall using sturdy L-brackets or by drilling holes through the branch and using screws with wall anchors. Ensure it’s level and secure.
Tips for Success
No matter which project you choose, keep these tips in mind:
- Measure Twice, Cut Once: This adage is as true for DIY coat hangers as it is for anything else.
- Use a Level: Ensure your hangers are installed straight for both aesthetic appeal and functionality.
- Don’t Skimp on Hardware: Use appropriate screws and anchors for your wall type to ensure your hangers can bear the weight of your items.
- Sand and Finish Properly: Even for rustic designs, a light sanding and a protective finish can significantly improve durability and appearance.
- Embrace Imperfection: Especially with reclaimed materials, minor flaws can add character.
Transforming your entryway from cluttered chaos to organized charm doesn’t require a hefty budget or professional expertise. By embracing the world of DIY wall-mounted coat hangers, you can inject personality, functionality, and a sense of handmade beauty into your home. Whether you’re drawn to the rustic allure of reclaimed wood, the sleek sophistication of modern designs, or the playful creativity of found objects, there’s a DIY project waiting to elevate your entryway. The process itself is rewarding, and the end result is a unique and practical piece that truly reflects your style and ingenuity. So, gather your inspiration, your tools, and your materials, and get ready to hang your hats, coats, and worries in style!